![]()
In this install note, I will discuss how to compile and install from source a GPU accelerated instance of tensorflow in Ubuntu 18.04. Tensorflow is a deep-learning framework developed by Google. It has become an industry standard tool for both deep-learning research and production grade application development.
Step 0 — Basic house-keeping:
Before starting the actual process of compiling and installing tensorflow, it is always good to update the already installed packages.
$sudo apt-get update
$sudo apt-get upgrade
Next step is to check for Nvidia CUDA support. This is done using a package called pciutils.
$sudo apt-get install pciutils
$lspci | grep -i nvidia
In this particular example deployment, the GPU that we will be using is: Nvidia Tesla P4. The output from the console should look something similar below:
00:04.0 3D controller: NVIDIA Corporation GP104GL [Tesla P4] (rev a1)
This helps us understand whether the GPU attached to the linux instance is properly visible to the system.
Now, we need to verify the linux version support. Run the following command in the terminal:
$uname -m && cat /etc/*release
The output from the console will look something similar below:
x86_64
DISTRIB_ID=Ubuntu
DISTRIB_RELEASE=18.04
DISTRIB_CODENAME=bionic
DISTRIB_DESCRIPTION="Ubuntu 18.04.1 LTS"
NAME="Ubuntu"
VERSION="18.04.1 LTS (Bionic Beaver)"
ID=ubuntu
ID_LIKE=debian
PRETTY_NAME="Ubuntu 18.04.1 LTS"
VERSION_ID="18.04"
HOME_URL="https://www.ubuntu.com/"
SUPPORT_URL="https://help.ubuntu.com/"
BUG_REPORT_URL="https://bugs.launchpad.net/ubuntu/"
PRIVACY_POLICY_URL="https://www.ubuntu.com/legal/terms-and-policies/privacy-policy"
VERSION_CODENAME=bionic
UBUNTU_CODENAME=bionic
Step 1 — Install dependencies:
First step to compile an optimized tensorflow installer is to fulfill all the installation dependencies. They are:
- build-essential
- cmake
- git
- unzip
- zip
- python3-dev
- pylint
In addition to the packages above, we will also need to install linux kernel header.
The header files define an interface: they specify how the functions in the source file are defined. These file are required for a compiler to check if the usage of a function is correct as the function signature (return value and parameters) is present in the header file. For this task the actual implementation of the function is not necessary. Any user could do the same with the complete kernel sources but that process will install a lot of unnecessary files.
Example: if a user wants to use the function in a program:
$int foo(double param);
the program does not need to know how the implementation of foo is, It just needs to know that it accepts a single param (double) and returns an integer.
To fulfill these dependencies, run the following commands in the terminal.
$sudo apt-get install -y build-essential cmake git unzip zip python3-dev pylint
$uname -r
$sudo apt-get install linux-headers-$(uname -r)
![]()
Step 2 — Install Nvidia CUDA 9.2:
Nvidia CUDA is a parallel computing platform and programming model for general computing on graphical processing units (GPUs) from Nvidia. CUDA handles the GPU acceleration of deep-learning tasks using tensorflow.
Before, we install CUDA, we need to remove all the existing Nvidia drivers that come pre-installed in Ubuntu 18.04 distribution.
$sudo apt-get purge nvidia*
$sudo apt-get autoremove
$sudo apt-get autoclean
$sudo rm -rf /usr/local/cuda*
Now, let us fetch the necessary keys, installer and install all the necessary Nvidia drivers and CUDA.
$sudo apt-key adv --fetch-keys http://developer.download.nvidia.com/compute/cuda/repos/ubuntu1710/x86_64/7fa2af80.pub
$echo "deb https://developer.download.nvidia.com/compute/cuda/repos/ubuntu1710/x86_64 /" | sudo tee /etc/apt/sources.list.d/cuda.list
$sudo apt-get update
$sudo apt-get -o Dpkg::Options::="--force-overwrite" install -y cuda-9-2 cuda-drivers
Once this step is done, the system needs to reboot.
$sudo reboot
After the system has been rebooted, let us verify if the Nvidia drivers and CUDA 9.2 are installed properly:
$echo 'export PATH=/usr/local/cuda-9.2/bin${PATH:+:${PATH}}' >> ~/.bashrc
$echo 'export LD_LIBRARY_PATH=/usr/local/cuda-9.2/lib64${LD_LIBRARY_PATH:+:${LD_LIBRARY_PATH}}' >> ~/.bashrc
$source ~/.bashrc
$sudo ldconfig
$nvidia-smi
The console output will be something similar below:
Sat Sep  8 20:03:42 2018
+-----------------------------------------------------------------------------+
| NVIDIA-SMI 396.44                 Driver Version: 396.44                    |
|-------------------------------+----------------------+----------------------+
| GPU  Name        Persistence-M| Bus-Id        Disp.A | Volatile Uncorr. ECC |
| Fan  Temp  Perf  Pwr:Usage/Cap|         Memory-Usage | GPU-Util  Compute M. |
|===============================+======================+======================|
|   0  Tesla P4            Off  | 00000000:00:04.0 Off |                    0 |
| N/A   41C    P0    23W /  75W |      0MiB /  7611MiB |      0%      Default |
+-------------------------------+----------------------+----------------------+

+-----------------------------------------------------------------------------+
| Processes:                                                       GPU Memory |
|  GPU       PID   Type   Process name                             Usage      |
|=============================================================================|
|  No running processes found                                                 |
+-----------------------------------------------------------------------------+
![]()
Step 3 — Install Nvidia CuDNN 7.2.1:
Nvidia CUDA Deep Neural Network library (cuDNN) is a GPU-accelerated library of primitives for deep neural networks. cuDNN provides highly tuned implementations for standard routines such as forward and backward convolution, pooling, normalization, and activation layers. cuDNN is part of the Nvidia Deep Learning SDK.
This is the next component of CUDA that is needed to for installing GPU accelerated tensorflow. Eventhough CuDNN is part of CUDA, the installation of CUDA alone, doesn’t install CuDNN. To install CuDNN, first we need an account with the Nvidia’s developer website. Once signed in, download the CuDNN installer from: https://developer.nvidia.com/cudnn
In this example it will look something similar below:
$ wget -O cudnn-9.2-linux-x64-v7.2.1.38.tgz https://developer.download.nvidia.com/compute/machine-learning/cudnn/secure/v7.2.1/prod/9.2_20180806/cudnn-9.2-linux-x64-v7.2.1.38.tgz?###Insert_API_Access_Token_Here###
Once the download is finished, you will have a file: cudnn-9.2-linux-x64-v7.2.1.38.tgz in your working directory.
Installation steps for CuDNN is very straightforward. Just uncompress the tarball file and copy the necessary CuDNN files to the correct locations.
$tar -xf cudnn-9.2-linux-x64-v7.2.1.38.tgz
$sudo cp -R cuda/include/* /usr/local/cuda-9.2/include
$sudo cp -R cuda/lib64/* /usr/local/cuda-9.2/lib64
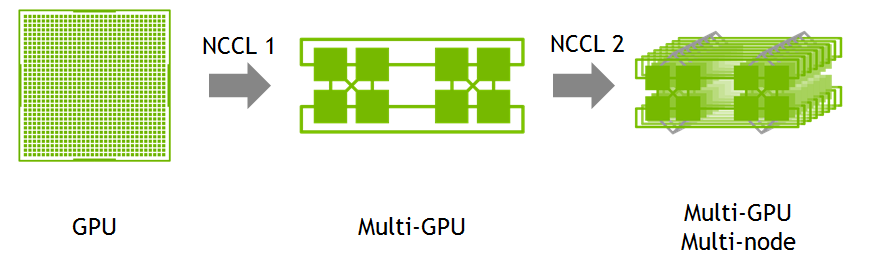
Step 4 — Install Nvidia NCCL:
The NVIDIA Collective Communications Library (NCCL) implements multi-GPU and multi-node collective communication primitives that are performance optimized for NVIDIA GPUs. NCCL provides routines such as all-gather, all-reduce, broadcast, reduce, reduce-scatter, that are optimized to achieve high bandwidth over PCIe and NVLink high-speed interconnect.
Developers of deep learning frameworks and HPC applications can rely on NCCL’s highly optimized, MPI compatible and topology aware routines, to take full advantage of all available GPUs within and across multiple nodes. This allows them to focus on developing new algorithms and software capabilities, rather than performance tuning low-level communication collectives.
TensorFlow uses NCCL to deliver near-linear scaling of deep learning training on multi-GPU systems.
To install NCCL 2.2.13, from the Nvidia developer page download the os agnostic version of NCCL from Nvidia developer website.
This process will look something similar to the example below:
$ wget -O nccl_2.2.13-1+cuda9.2_x86_64.txz https://developer.download.nvidia.com/compute/machine-learning/nccl/secure/v2.2/prod/nccl_2.2.13-1%2Bcuda9.2_x86_64.txz?###Insert_API_Access_Token_Here###
Once the download is finished, the working directory will have a file: nccl_2.2.13-1+cuda9.2_x86_64.txz
Similar to CuDNN installation, the steps for NCCL installation are similar. Uncompress the tarball file, copy all the files to the correct directories and then update the configuration. Follow the step below to install NCCL:
$tar -xf nccl_2.2.13-1+cuda9.2_x86_64.txz
$cd nccl_2.2.13-1+cuda9.2_x86_64
$sudo cp -R * /usr/local/cuda-9.2/targets/x86_64-linux/
$sudo ldconfig
Step 5 — Install Nvidia CUDA profiling tool:
One last step, before we start compiling tensorflow is to install the CUDA profiling tool: CUPTI. Nvidia CUDA Profiling Tools Interface (CUPTI) provides performance analysis tools with detailed information about how applications are using the GPUs in a system.
CUPTI provides two simple yet powerful mechanisms that allow performance analysis tools such as the NVIDIA Visual Profiler, TAU and Vampir Trace to understand the inner workings of an application and deliver valuable insights to developers.
The first mechanism is a callback API that allows tools to inject analysis code into the entry and exit point of each CUDA C Runtime (CUDART) and CUDA Driver API function.
Using this callback API, tools can monitor an application’s interactions with the CUDA Runtime and driver. The second mechanism allows performance analysis tools to query and configure hardware event counters designed into the GPU and software event counters in the CUDA driver. These event counters record activity such as instruction counts, memory transactions, cache hits/misses, divergent branches, and more.
Run the following commands on the terminal to install CUPTI:
$sudo apt-get install -y libcupti-dev
$echo 'export LD_LIBRARY_PATH=/usr/local/cuda/extras/CUPTI/lib64:$LD_LIBRARY_PATH' >> ~/.bashrc
Step 6 — Install Tensorflow dependencies:
Tensorflow and the related Keras API installation requires:
- numpy
- python3-dev
- pip
- python3-wheel
- keras_applications and keras_preprocessing without any associated package dependencies
- h5py
- scipy
- matplotlib
These dependencies can be fulfilled by running the following commands in the terminal.
$sudo apt-get install python3-numpy python3-dev python3-pip python3-wheel
$sudo pip3 install keras_applications --no-deps
$sudo pip3 install keras_preprocessing --no-deps
$sudo pip3 install h5py scipy matplotlib
We also need to install the dependencies for the build tool Tensorflow uses: Bazel.
The dependencies for Bazel can be fulfilled by running the commands below in linux terminal.
$ sudo apt-get install pkg-config zip g++ zlib1g-dev unzip python3
Step 7 — Install Tensorflow build tool; Bazel:
Bazel is a scalable and highly extensible build tool created by Google that promises to speed up the builds and tests, that is created for multiple languages. It only rebuilds what is necessary. With advanced local and distributed caching, optimized dependency analysis and parallel execution, Bazel achieves fast and incremental builds.
Bazel can be used to build and test Java, C++, Android, iOS, Go and a wide variety of other language platforms. Bazel is officially supported for Linux. The promise of Bazel as a build tool is that it helps you scale your organization, code base and Continuous Integration system. It handles code bases of any size, in multiple repositories or a huge mono-repo.
Using Bazel, it is easy to add support for new languages and platforms with Bazel’s familiar extension language. The growing Bazel community has written Share and re-use language rules. Google has incorporated Bazel as the build tool for Tensorflow due to their belief that it is a better fit for the project than built-in tools in linux such as cmake. The inclusion of Bazel as the build tool adds one extra step of complexity to how GPU optimized Tensorflow is deployed in linux, from source.
To keep things neat and tidy, we will use the latest Bazel binary from GitHub, set the correct permissions to run the file as an executable in linux, run the file and update the configuration files. To install Bazel using these steps, run the following commands in the linux terminal.
$wget https://github.com/bazelbuild/bazel/releases/download/0.16.1/bazel-0.16.1-installer-linux-x86_64.sh
$chmod +x bazel-0.16.1-installer-linux-x86_64.sh
$./bazel-0.16.1-installer-linux-x86_64.sh --user
$echo 'export PATH="$PATH:$HOME/bin"' >> ~/.bashrc

$source ~/.bashrc
$sudo ldconfig
Step 8 — Fetch latest Tensorflow version from GitHub and configure the build:
One of the key advantages of compiling from source is that, one can leverage all the latest features and updates released directly on GitHub. Typically the updated installer can take a few hours or days to show in the usual distribution channels. Therefore, in this example, we will build the latest Tensorflow version, by directly getting the source files from GitHub.
To fetch the latest source files from GitHub and configure the build process, run the following commands in the terminal.
$git clone https://github.com/tensorflow/tensorflow.git
$cd tensorflow
$git pull
$git checkout

$./configure
Here is an example configuration.
Please specify the location of python. [Default is /usr/bin/python]: /usr/bin/python3
Do you wish to build TensorFlow with jemalloc as malloc support? [Y/n]: Y
Do you wish to build TensorFlow with Google Cloud Platform support? [Y/n]: Y
Do you wish to build TensorFlow with Hadoop File System support? [Y/n]: Y
Do you wish to build TensorFlow with Amazon S3 File System support? [Y/n]: Y
Do you wish to build TensorFlow with Apache Kafka Platform support? [Y/n]: Y
Do you wish to build TensorFlow with XLA JIT support? [y/N]: N
Do you wish to build TensorFlow with GDR support? [y/N]: N
Do you wish to build TensorFlow with VERBS support? [y/N]: N
Do you wish to build TensorFlow with OpenCL SYCL support? [y/N]: N
Do you wish to build TensorFlow with CUDA support? [y/N]: Y
Please specify the CUDA SDK version you want to use. [Leave empty to default to CUDA 9.0]: 9.2
Please specify the location where CUDA 9.2 toolkit is installed. Refer to README.md for more details. [Default is /usr/local/cuda]: /usr/local/cuda-9.2
Please specify the cuDNN version you want to use. [Leave empty to default to cuDNN 7.0]: 7.2.1
Please specify the location where cuDNN 7 library is installed. Refer to README.md for more details. [Default is /usr/local/cuda-9.2]: /usr/local/cuda-9.2
Do you wish to build TensorFlow with TensorRT support? [y/N]: N
Please specify the NCCL version you want to use. [Leave empty to default to NCCL 1.3]: 2.2
Please specify the location where NCCL 2 library is installed. Refer to README.md for more details. [Default is /usr/local/cuda-9.2]: /usr/local/cuda-9.2/targets/x86_64-linux
Please note that each additional compute capability significantly increases your build
time and binary size. [Default is: 3.7]
Do you want to use clang as CUDA compiler? [y/N]: N
Please specify which gcc should be used by nvcc as the host compiler. [Default is /usr/bin/gcc]: /usr/bin/gcc
Do you wish to build TensorFlow with MPI support? [y/N]: N
Please specify optimization flags to use during compilation when bazel option "--config=opt" is specified [Default is -march=native]: -march=native
Would you like to interactively configure ./WORKSPACE for Android builds? [y/N]:N
Step 9 — Build Tensorflow installer using Bazel:
Since, we are targeting Tensorflow build process for Python 3, this is two step process.
- Build from the Tensorflow source files, the necessary files for creating a Python 3 pip package
- Build the wheel installer using the Python 3 pip package files and run this installer
$bazel build --config=opt //tensorflow/tools/pip_package:build_pip_package
The build process will take a very long time to complete and is dependent on the compute resources available to complete the build process.
Once the build process is completed, to create the wheel installer using Bazel and then run the installer file, run the following commands in the terminal.
$sudo bazel-bin/tensorflow/tools/pip_package/build_pip_package /tmp/tensorflow_pkg
$sudo pip3 install /tmp/tensorflow_pkg/tensorflow-*.whl
Step 10 — Testing Tensorflow installation and install Keras:
Keras is a high-level neural networks API, written in Python and capable of running on top of TensorFlow, CNTK, or Theano. I am a huge fan of Keras API due to its seamless integration with Tensorflow. It also allows application developers to implement one of the foundational concepts of software engineering: Don’t Repeat Yourself(DRY), when it comes to building and testing deep-learning applications. Keras APIs also help build scalable, maintainable and readable code base for deep-learning applications.
To test Tensorflow installation:
$python3

### Run this inside python interpreter ###
>>>import tensorflow as tf
>>>hello = tf.constant('Hello, TensorFlow!')
>>>sess = tf.Session()
>>>print(tf.__version__)
>>>print(sess.run(hello))
To install Keras from source and test this installation, run the following commands in the linux terminal.
$git clone https://github.com/keras-team/keras.git
$cd keras
$sudo python3 setup.py install
$python3 -c "import keras"
This is a long install note. Compared to my install note from last year, on the same topic, the steps involved has increased dramatically. Most of it is due to the added features incorporated in Tensorflow, such as its ability to create and process distributed compute graphs.
![]()
As a concluding note, as part of our mission to empower developers of deep-learning and AI, at Moad Computer, we have a cloud environment: Jomiraki and a server platform: Ada. Both of them leverages Nvidia CUDA accelerated Tensorflow to achieve faster deep-learning application performance. We have also released a Raspberry Pi deep-learning module, but instead of CUDA acceleration, uses a slightly different technology called the Intel Neural Compute Stick. Check out all of these cool tools in our store.
If you have any questions or comments, feel free to post them below or reach out to our support team at Moad Computer: [email protected]